 Save
Save I still remember the first time I made a proper pickled vegetable board—it was for a dinner party where I'd promised something both impressive and vegan-friendly. I'd spent the afternoon julienning carrots and slicing cucumbers with the precision of someone absolutely determined not to mess this up, and when I poured that warm brine over the vegetables, watching the colors shift and deepen, I felt this quiet satisfaction. That night, watching guests arrange the vegetables on their plates like edible art, I realized that sometimes the simplest preparations create the most memorable moments.
I made this once for a potluck where everyone was bringing something heavy and complicated, and my simple pickled platter somehow became the thing people kept returning to all evening. There was something about the ritual of it—the way people would pick through the jars, mixing colors on their plates—that made the meal feel more like gathering than eating.
Ingredients
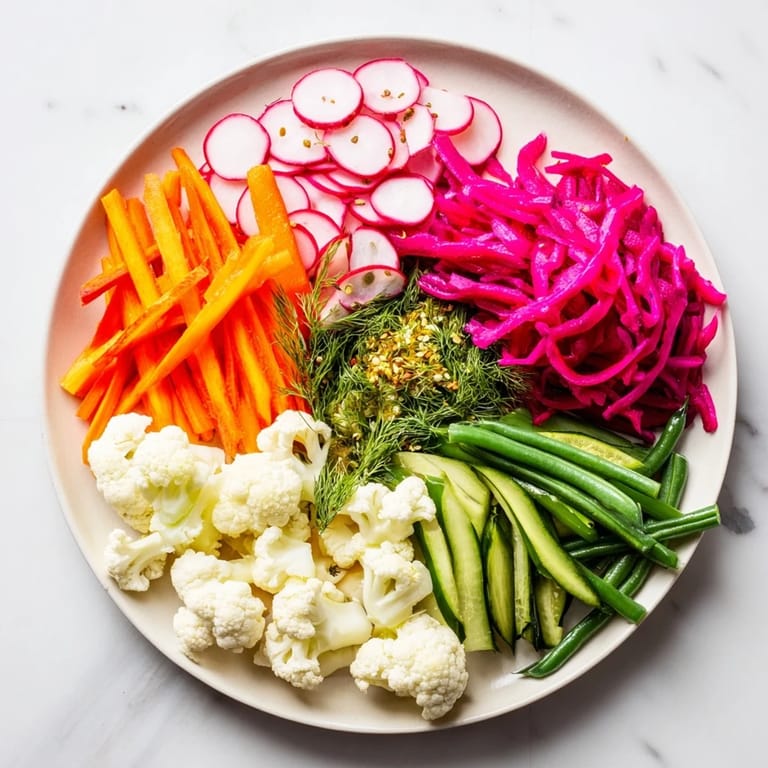
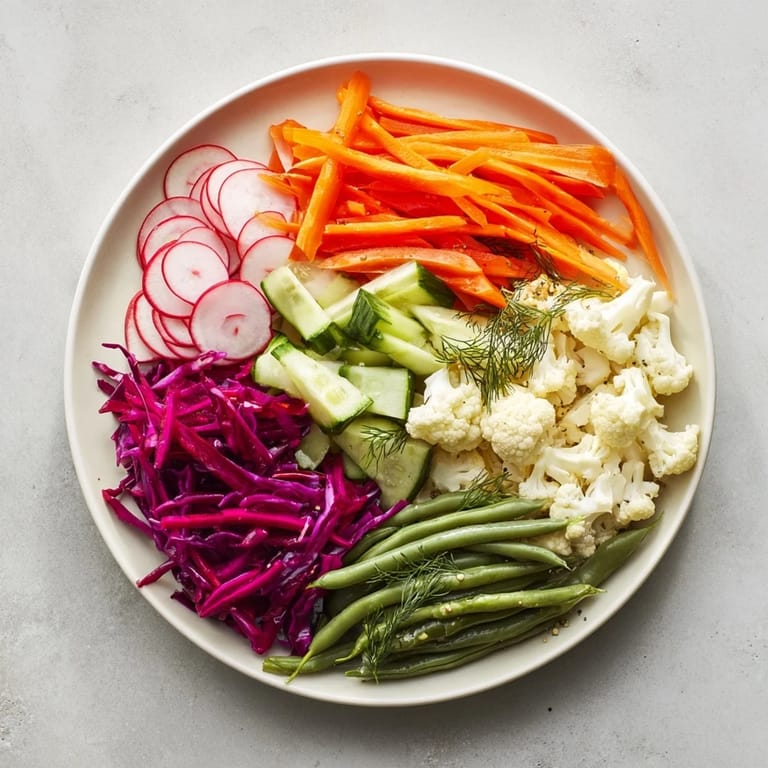
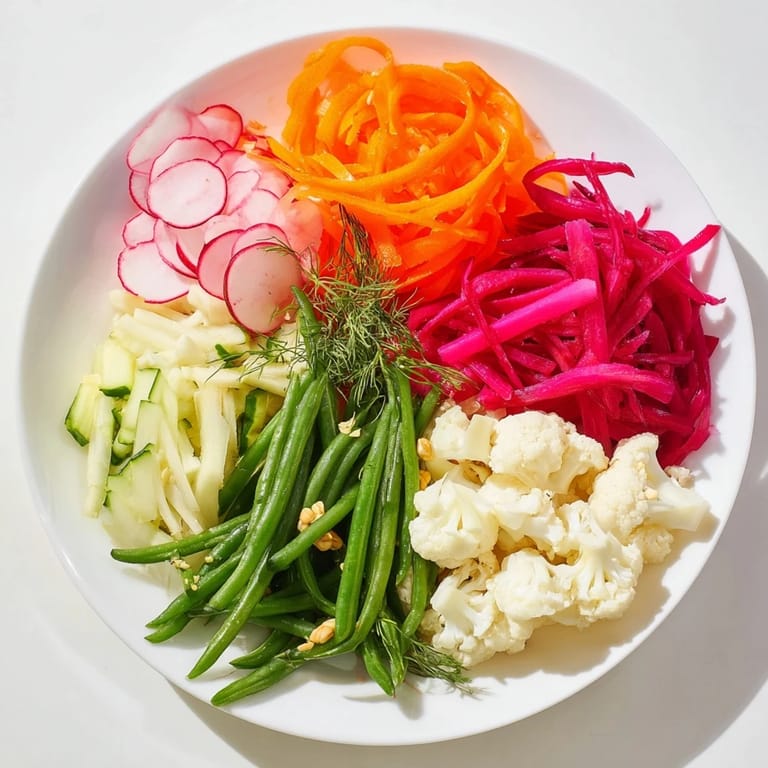
- Carrots: Fresh and firm carrots are crucial—they hold their crunch even after days of pickling, and julienning them thin means they absorb flavor quickly
- Cucumber: Choose smaller, firmer cucumbers if you can find them; they pickle better than large watery ones and stay crisp
- Radishes: These bring peppery heat and that satisfying snap—they're the texture MVP of this platter
- Red cabbage: It bleeds color into the brine beautifully, staining everything a gorgeous pink, and the sweetness balances the vinegar perfectly
- Cauliflower florets: Keep them small so they pickle evenly; they become tender but never mushy if you don't overcook them
- Green beans: Trim the ends and leave them whole—they stay sturdy and add a welcome earthiness
- White vinegar: This is your foundation; it's clean and bright and doesn't overpower the vegetables
- Water: Dilutes the vinegar so it's tangy without being harsh
- Sugar: Just enough to round out the flavors and prevent the brine from tasting too aggressively sour
- Kosher salt: Don't skip this—it dissolves evenly and doesn't have additives like iodized salt does
- Garlic cloves: Slice them thin so they release their flavor into the brine as they soften
- Mustard seeds: These add subtle warmth and a gentle nuttiness that you taste with each bite
- Coriander seeds: They're warm and slightly sweet, grounding the whole thing with an almost citrus undertone
- Black peppercorns: Leave them whole—they slowly release their spice and you get little hits of heat as you eat
- Bay leaves: Add them for depth; they work quietly in the background like good seasoning should
- Fresh dill: This is my secret to making everything taste alive and fresh, even months later
- Red chili: Optional, but it brings visual drama and a gentle heat that builds slowly
- Kimchi and sauerkraut: If you're including these fermented additions, they should be raw and unpasteurized for maximum probiotic benefit
Tired of Takeout? 🥡
Get 10 meals you can make faster than delivery arrives. Seriously.
One email. No spam. Unsubscribe anytime.
Instructions
- Prepare Your Stage:
- Wash all your vegetables under cold running water, then pat them completely dry. This is important—any lingering water dilutes your brine. Lay everything out on your cutting board and start julienning the carrots into thin, elegant matchsticks. Slice your cucumbers on a slight bias so they have more surface area to absorb the brine. Thin-slice your radishes (a mandoline makes this meditative), shred the cabbage into wispy ribbons, trim those green beans into 2-inch pieces, and cut your cauliflower into bite-sized florets. Work thoughtfully—these vegetables will be the star of the show.
- Build Your Brine:
- Pour your vinegar and water into a saucepan and set it over medium heat. Add the sugar and kosher salt, then stir gently as everything comes to a boil. Watch for the moment when the sugar dissolves completely and the liquid becomes clear. This takes maybe 5 minutes. Once it's boiling, remove it from the heat immediately and let it cool for about 10 minutes—you want it warm enough to fully open the vegetables' pores but cool enough that you can safely handle the jars.
- Pack Your Vessels:
- Have your clean glass jars or bowls ready. Start packing vegetables into them, grouping the colors together for visual impact—all the orange carrots in one jar or section, all the purple cabbage in another. This isn't just pretty; it also helps you visualize which flavors go where. Distribute your aromatics evenly—a few slices of garlic in each jar, a pinch of mustard seeds, coriander seeds, a bay leaf, a sprig of dill. If you're using that red chili, fan a few slices across the top of each jar for that final flourish.
- Submerge Everything:
- Carefully pour your warm brine over the vegetables, making sure every single piece is covered. This is essential—any vegetable peeking above the brine will turn brown and develop off-flavors. Pour slowly and thoughtfully, watching the brine fill the gaps and carry the spices down into the depths of the jar.
- Cool and Refrigerate:
- Let the jars cool completely to room temperature, then slide them into the refrigerator. Now comes the hardest part—waiting. At 12 hours, they'll be pleasantly pickled with that initial bright crunch. At 24 hours, the flavors will have settled into something more complex. By 48 hours, you've got something genuinely sophisticated.
- Optional Fermentation Path:
- If you want to go the traditional fermentation route, make a 2% salt brine instead (that's 20 grams of salt per liter of water), pack your vegetables without the vinegar, weight them down with a smaller jar inside the larger one so they stay submerged, and leave them at room temperature. Check daily for bubbling and smell. After 5-7 days, when the bubbling slows and the vegetables develop a gentle funk, transfer to the refrigerator where fermentation slows dramatically.
- Arrange and Present:
- When you're ready to serve, arrange your pickled vegetables in their jars or in small bowls, creating patterns on a wooden board or serving tray. Linear arrangements feel modern and precise; grid patterns feel more playful. The visual contrast of colors is half the magic here—let that sing.
 Save
Save There was this moment during a family dinner when my grandmother—who grew up pickling vegetables the traditional way—tasted these and got quiet. Then she smiled and said they tasted like possibility. That's when I understood that this recipe isn't really about the vegetables at all; it's about transformation and the patience to let flavors develop on their own timeline.
The Art of Texture
The magic of this platter lives entirely in texture. Each vegetable brings something different—the snap of radishes, the firmness of green beans, the yielding crispness of cauliflower, the tender ribbons of cabbage. When you eat these pickled vegetables, you're not experiencing a single flavor or texture; you're experiencing a conversation between different ways of being. This is why arrangement matters. When you group them by color and texture, you're not just making something pretty; you're inviting people to taste with intention, to notice the differences between one bite and the next.
Playing with Flavor Variations
Once you've made this basic version a few times, the experimentation becomes irresistible. Different vinegars completely change the personality of the plate—rice vinegar brings delicate sweetness, apple cider vinegar adds warmth and depth, red wine vinegar creates something more serious and complex. Fresh herbs shift everything too. Try tarragon for elegance, thyme for earthiness, or cilantro for brightness. Citrus zest in the brine (lemon, lime, or orange) adds aroma that hits you the moment you open the jar. I've even experimented with adding a star anise pod or a strip of orange peel, and suddenly you've got something that tastes like it came from a completely different tradition.
Serving Wisdom and Pairing Perfection
This platter wants to be part of something bigger. Serve it alongside crusty bread and good butter, next to a board of cured meats and cheese (or vegan equivalents), beside some olives and fresh herbs. It becomes the thing people keep returning to because it clears the palate and refreshes the mouth between richer bites. Wine-wise, think crisp and refreshing—a Riesling with its slight sweetness balances the vinegar beautifully, or a dry rosé that echoes the brightness without competing. Even a cold sparkling water with citrus becomes better when you're eating these vegetables.
- Make these 2-3 days ahead of any gathering and your stress level drops completely
- Leftover brine can be reused once more before it gets too watered down from vegetable liquid, so don't throw it away
- These will keep in the refrigerator for up to 3 weeks, getting more mellow and integrated the longer they sit
 Save
Save This recipe lives in the space between planning and spontaneity—you decide what to make hours or days in advance, but then you mostly just let time and chemistry do the work. That's where the real beauty lives.
Recipe Questions & Answers
- → How long should the vegetables be pickled or fermented?
Quick pickling requires at least 12 hours in the refrigerator, while fermentation takes 5 to 7 days at room temperature for deeper flavor development.
- → Can I use different vegetables for this platter?
Yes, seasonal vegetables such as beets, turnips, or pearl onions can be substituted or added to create varied flavors and colors.
- → What spices are used to enhance the flavor?
Aromatic spices including garlic slices, mustard seeds, coriander seeds, black peppercorns, bay leaves, fresh dill, and optional red chili are included for complexity.
- → Is this dish suitable for a vegan or gluten-free diet?
Yes, the dish is naturally vegan and gluten-free, but check any store-bought fermented items for hidden allergens.
- → How should the platter be served for best presentation?
Arrange the pickled and fermented vegetables in neat linear or grid patterns on a serving board or tray for a colorful and visually striking display.